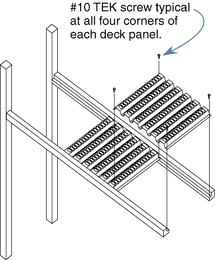
DACS, Inc. recommends the following instruction for installation of Punch Deck®. This installation procedure
is based upon testing done by
DACS, Inc., and is intended to
provide the end user of the rack
system the strongest, most durable
system possible. All published rack
deck load information is based upon
these installation procedures.
If these installation instructions
are not followed, DACS, Inc. will
not be held responsible for
rack deck failures.
|
 |
Step 1 - Place 1st panel into step beams at
far left side of shelf. Position panel so required
transverse flue space is maintained between
left edge of panel and shelf in adjacent
rack bay.
Step 2 - Tek screw 2 left hand corners of 1st
panel into step beam.
Step 3 - Position remaining deck panels into
step beam, overlapping as required at joints.
Step 4 - Tek screw remaining panels into
beam through overlapping joints and at
2 right hand corners.
|
|
All content © 2008 DACS, inc.
|
Punch Deck ® and the Punch Deck ® logo are registered trademarks of DACS, inc.
|

